Overviewcopied
The core principle behind todo.space is to keep things as simple as possible for as long as possible. To fulfil this principle while you work on your projects todo.space brings a set of tools. You'll find tools to keep projects manageable; tools that constrain overwhelm, overwork and overplanning; that provide you with a clear project status and history so that you don't need complex reports but if you do, then you can always open the project in Excel or Google Sheets and do all sorts of magic in the spreadsheets apps we all know and love instead of learning yet another proprietary query language for custom reports.
Project Structurecopied
The first screen you see is Project Structure. It looks a bit like a mindmap, however, this is where the similarities end. The main purpose of the Project Structure view is to break down a monolith of a business idea or a complex project into smaller, more approachable units with distinct objectives. Each node in this mindmap represents boundaries of work — kanban boards — that's where you will create tasks. To open Project Structure view when you're in on of the boards view — click on the icon in the sidebar.
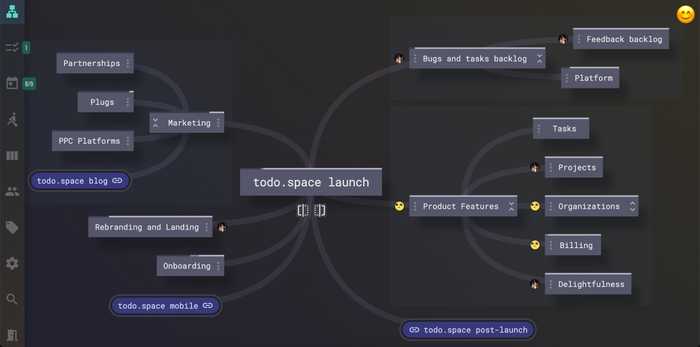
Think of it this way: To start a new business you will have to deal with tasks related to Operations, and there will be Marketing, and there will be work on Product which can be split into MVP and Backlog. Therefore, instead of having a giant list of tasks for all the things, you create separate work containers.
Adding Boards and Tasks
To create child or sibling board, hover on a board and you will see three buttons. One — to create a child board, and other two — to create siblings above and below this board.
To start creating tasks in each of those containers, you hover on a board and click "OPEN". This will open it as a Kanban Board.
You can read more about the operations with board in the next section — Board Menu.
Board Menucopied
By clicking on the three dots icon on a board in Project Structure, you open Board Menu. This is where you get the menu of operations you can do with boards: Adding tasks, moving, merging, deleting boards, linking other projects, as well as extracting the entire subtree into a separate project. You can learn more about the last two operations in the Advanced Topics.
You can also create tasks right there instead of opening the board as a Kanban Board.
You can't move a board higher or lower, change font size or color — we want to discourage you from using Project Structure as a mindmap or PowerPoint. However, in some cases, if you really-really want it badly — we have a workaround for you:
- Create a sibling board at the location you want to move your board and title it the same as your original board.
- Merge your original board into a newly created board — all the tasks and children board will be preserved.
Zero-Click Status Popupcopied
When you hover on a board, you will see the board with its entire subtree get highlighted. Also a popup appears with a quick status of this subproject — the board and its children are effectively subprojects and you can even extract them into separate projects, read more in Extracting subprojects.
If you examine the popup from top to bottom, you will see that the status consists of the following:
- Board name and an emoji indicating if the backlog is growing and getting smaller.
- Board Progress Indicator.
- Who created the board.
- The exact number of tasks in the entire subproject in each of three statuses.
- Top contributors.
- Recent activity — tasks created, completed, etc.
Board Progress Indicatorcopied
Progress Indicator is a horizontal stacked bar that you can see on every board in Project Structure view and in Board Popup. It represents the task completion status (New, In Progress, Completed) not just of the board itself but also of all its children. For example, imagine you have a board "Product" with two children — "MVP", "Backlog":
- "Product" does not have tasks
- "MVP" has six tasks — one New, two — In Progress, three — Completed
- "Backlog" has four tasks — one New, one — In Progress, two — Completed
In this case, the Progress Indicator for "Product" will have ten tasks in the entire subtree — none in "Product" but four in "MVP" and six and "Backlog", and out of those ten — two are in New, three are In Progress and five are Completed. So the Progress Indicator will have 20% of its length in "New" color, 30% — in "In Progress" color, and 50% — in "Completed" color.
One more example:
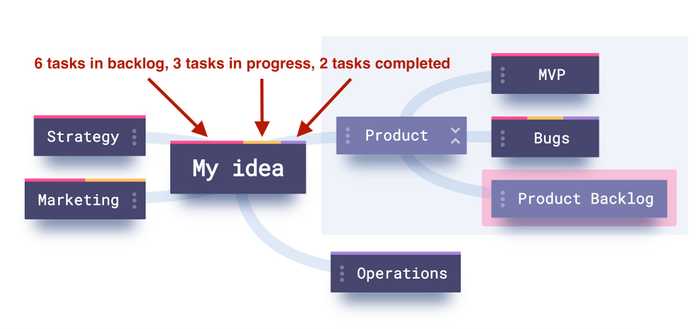
Project Status Indicatorcopied
Project Status Indicator is the emoji in the top right corner in Project Structure view. It represents a high-level health of the project. When there are no concerns, you get a happy emoji. When there are issues with your project such as infinite boards, too many boards, too little tasks per board, etc, the emoji face will look more and more concerned.
If you click on the emoji — you will get a popup with basic project stats and detailed description of project health issues with how to address them.
Boards Overviewcopied
To help you with tasks management, todo.space comes with several types of boards:
- Kanban
- Status
- Planning
- To Do List
When viewed in Kanban or Planning view, each board has breadcrumbs that show where the board is located relative to the root board. Little icons between crumbs show if the board is located to the left from the root or to the right from it.

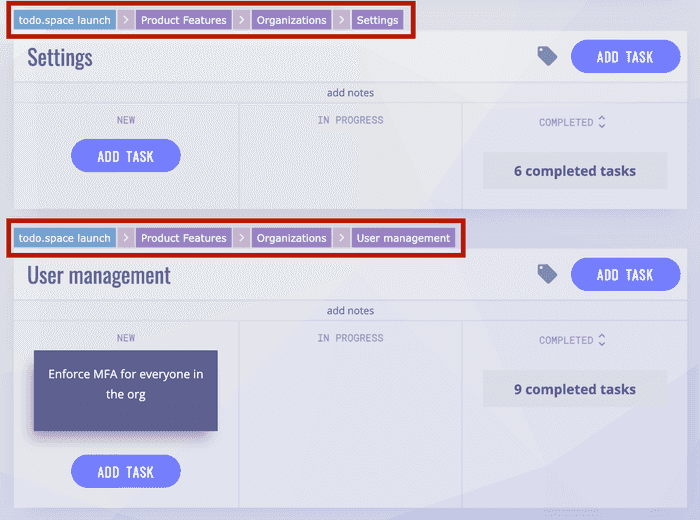
You can also write notes in each board. For example, if you treat boards as subprojects, you can use notes to write objectives for subprojects, contextually important information.
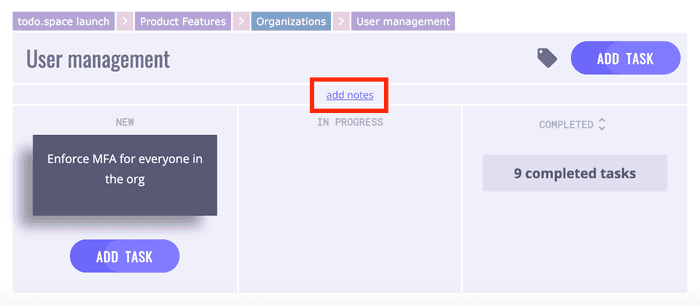
There is one more thing that you can do with boards which is discussed in advanced topics later in this guide — tagging boards.
Kanban Boardcopied
If you hover on a board in Project Structure view and click "OPEN" or click in the project sidebar — it will open the current board and all its children boards in a Kanban mode.
It's a classic Kanban with three columns representing three statuses in which a Task can be: New, In Progress, Completed. You can't have other or custom statuses in todo.space. It is one of the safeguards that we have built to maintain clarity and focus. Kanban boards are pretty straightforward — you just drag tasks from one column to another when the status of a task changes.
Notice that you can collapse all completed tasks to clear up your workspace from clutter by clicking on icon next to COMPLETED column header. You can always unfold them back the same way you collapsed them.
Kanban boards are perfect if you work only on tasks on a specific board/subtree in the project, for example, when you work only on marketing while somebody else works on product, etc. In this case, you may as well consider extracting your board into a separate project, read more about extracting subprojects. However, if this is not the case, you may find that the combination of Planning board and To Do List is what you really need. Keep reading to the next paragraph.
Planning Boardcopied
Planning board is a special view of your project designed to let you pick what to work on next easily. To open it, click the button in the project sidebar. Here, pick the tasks you want by clicking the "Work on next" toggle. Planned tasks will appear in the To Do List.
Pay attention to the planning status indicator next to the button in the sidebar. The number of planned tasks (left number) cannot be greater than the limit (right number) but don't worry — todo.space won't let it happen and will show a warning popup. To make the best use of this feature, plan only those tasks for which it is obvious that they should be worked on in the nearest future. If the number of planned tasks grows too big, this may be a sign that you are either overplanning, or simply have too few people working on the project. If the latter is the case, consider bringing more collaborators to the project — each additional collaborator adds 3 tasks to the planning limit.
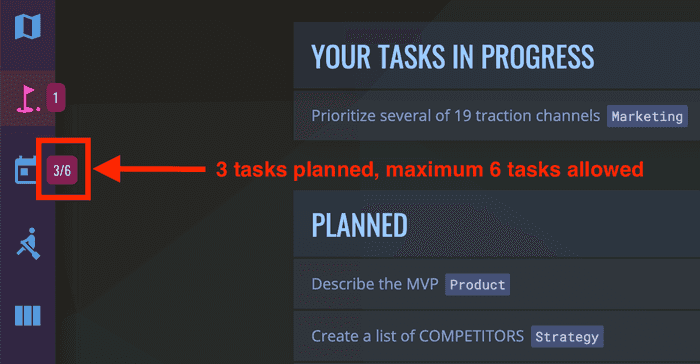
The concept of planning in todo.space is limited to scope and bandwidth, not dates. This is another anti-stress safeguard .
To Do Listcopied
To Do List is the view where you see all the tasks that you planned to work on in Planning Board. To Do List gives you a way to see and work on the next steps for your entire project in one place. See this video for details.
Status Boardcopied
Status board is meant to answer the core questions in project management:
- Who is working on what, and what's everyone's workload?
- What work was completed?
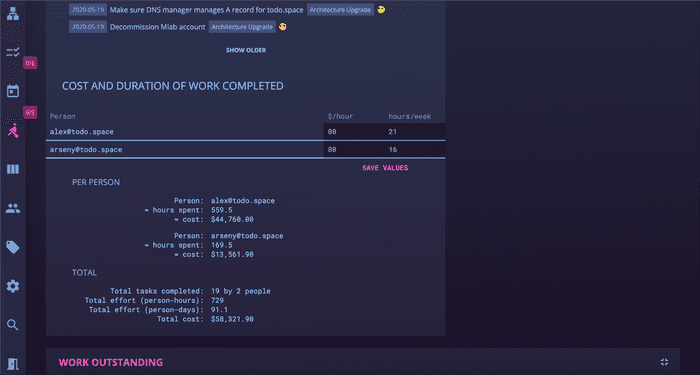
- How much did it cost and how long did it take?
- What is the work outstanding?
- Will this project ever gonna be done?
- What new work was added?
- How long does it take to complete a task, and how big is the variation?
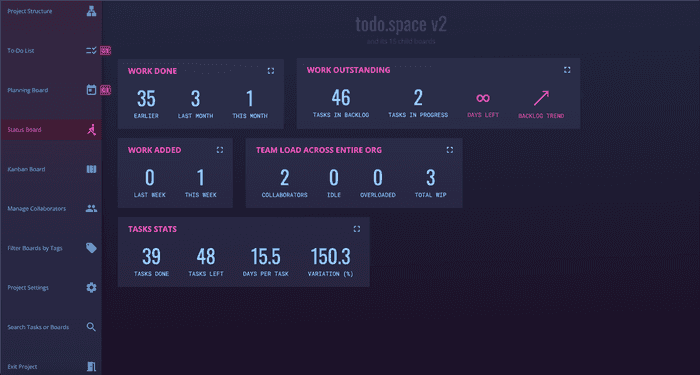
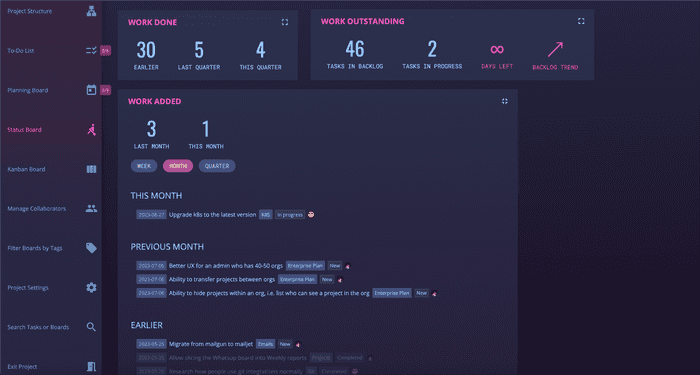
To get more detailed answers to these questions, click on button in the top right corner, and you will get more details when the widget expands. For example, expanding the WORK ADDED widget will show you the list of tasks created sorted from newest to oldest, and grouped by WEEK or MONTH or QUARTER.
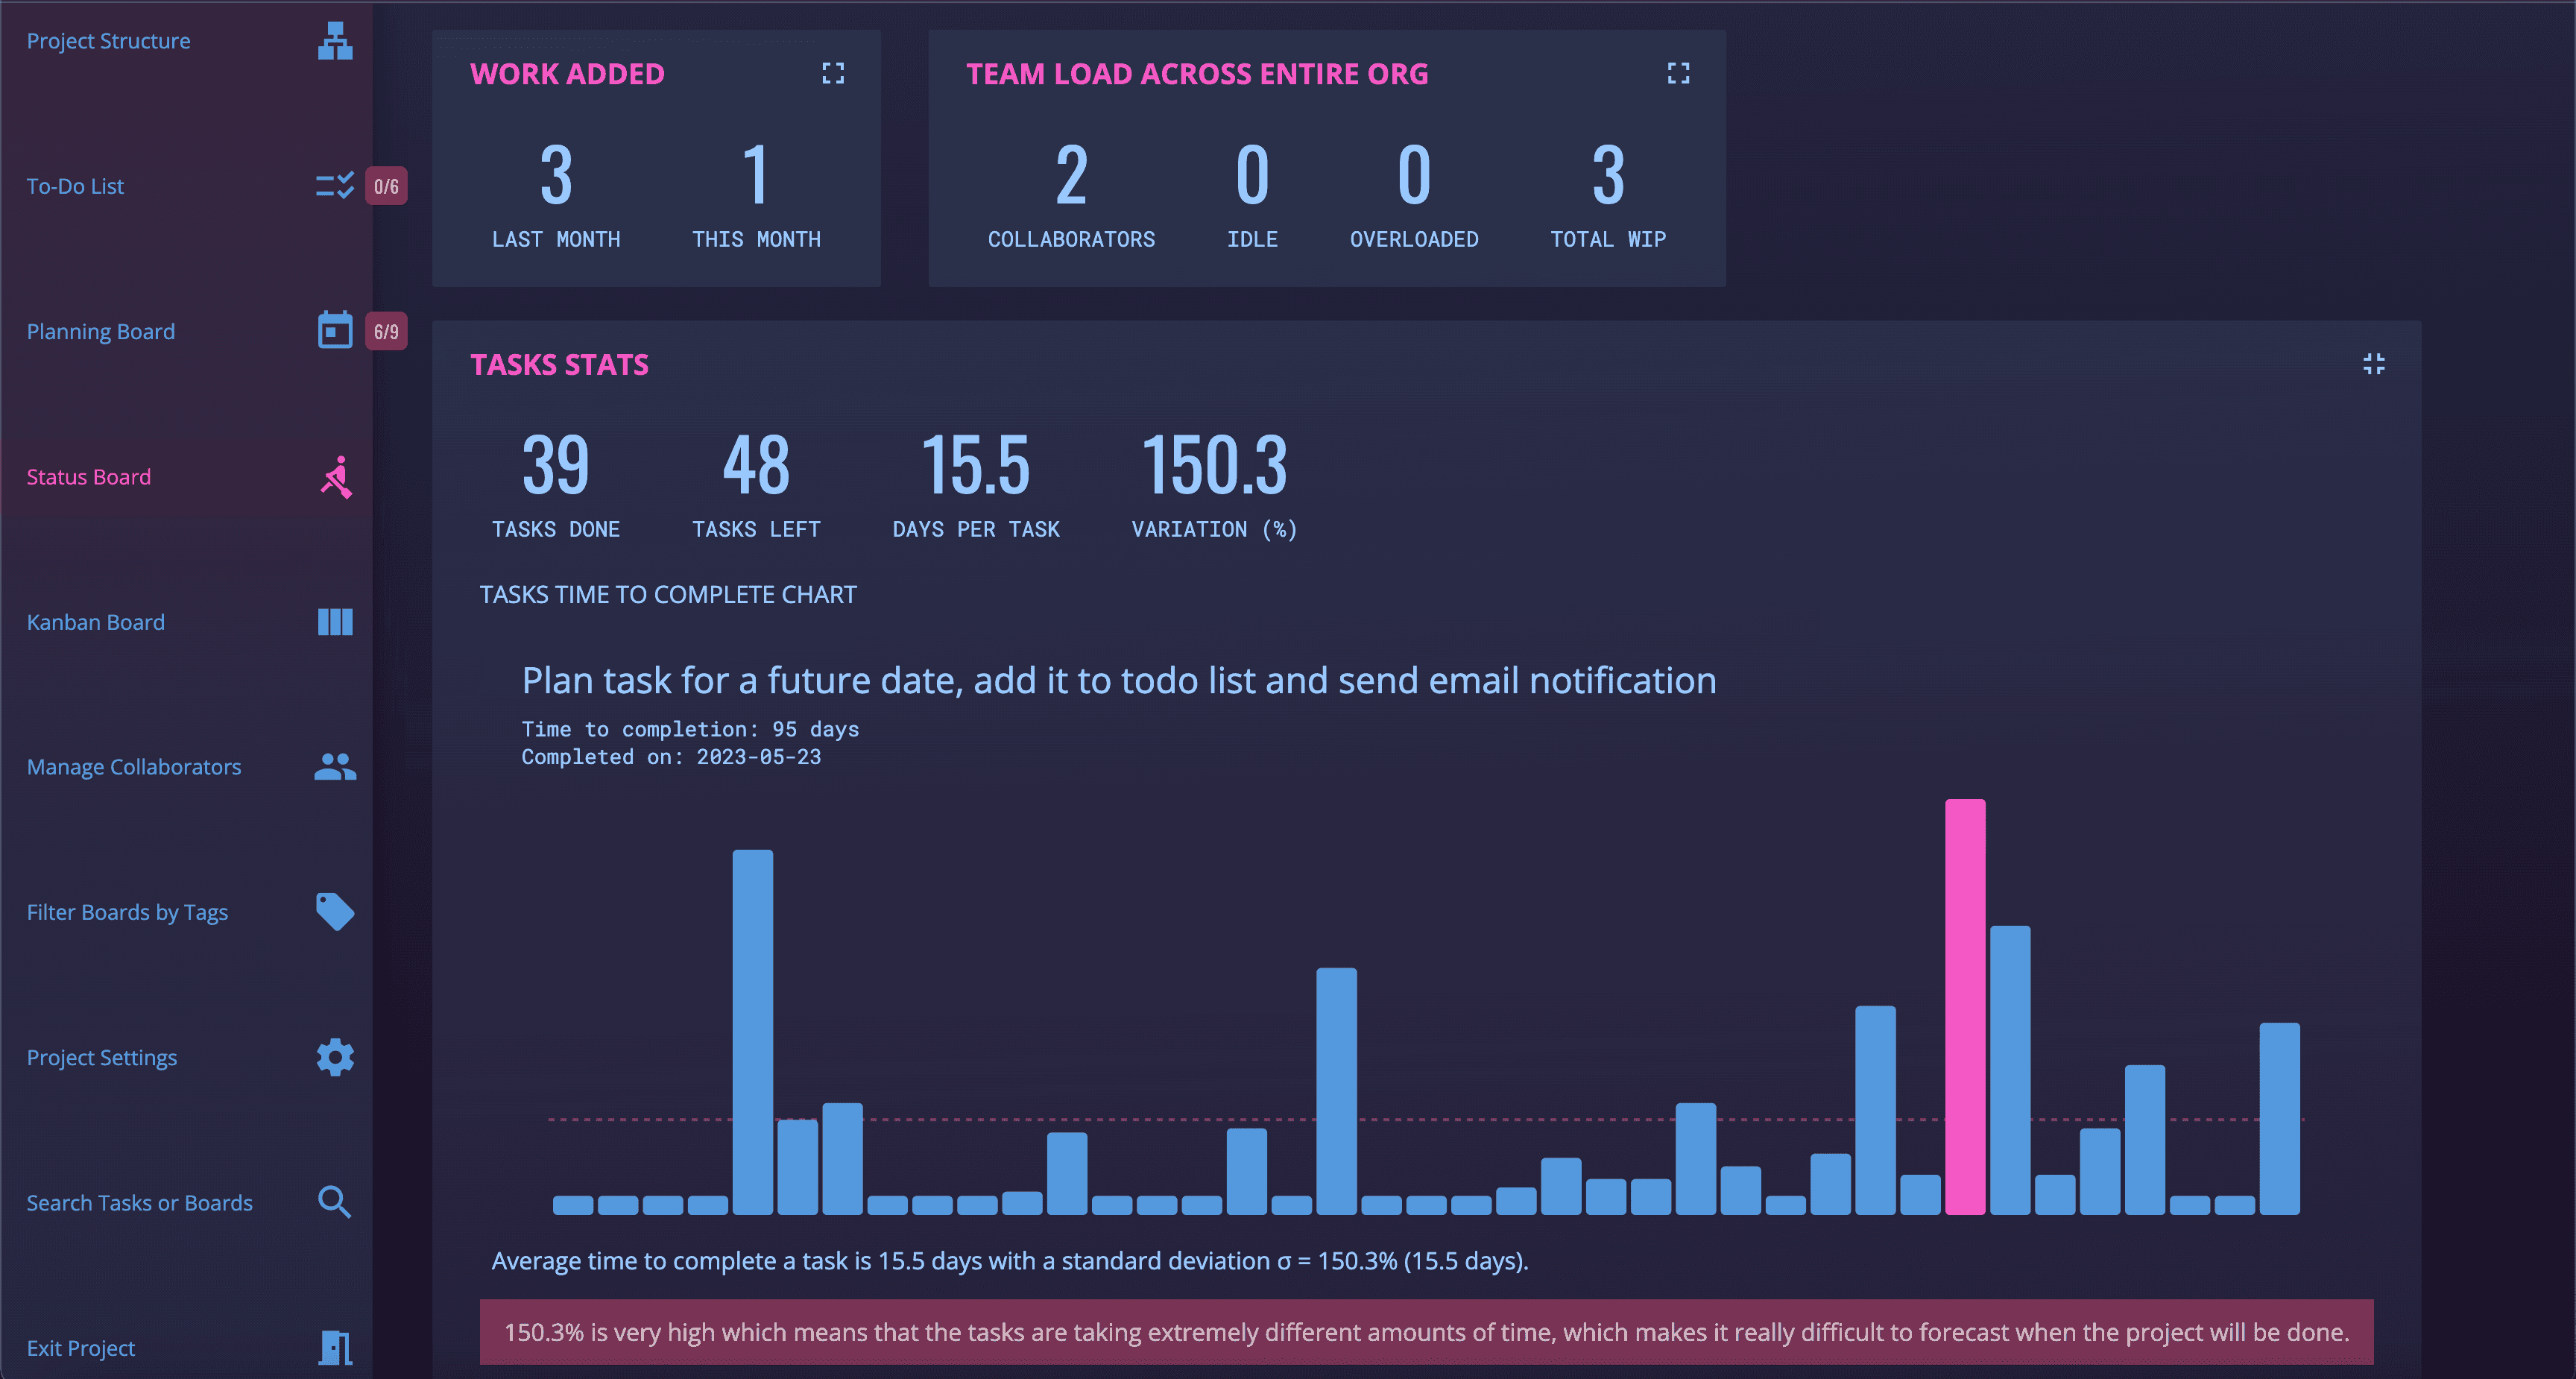
Similarly, expanding TASK STATS will let you see outliers in terms of time to complete a task. In this example, you can see that the task "Plan task for a future date, add it to todo list and send email notification" took 95 days to complete — way longer than the average 15.5 days.
Expanding WORK ADDED not only gives the list of created tasks but also allows you to see the time it took and cost per person. You can also download the whole project report as an Excel file in case you need to do pivot tables and other sophisticated calculations.
Taskscopied
While nodes/boards are containers for work, the actual work is documented in Tasks. Before you start writing down tasks, read these two short articles on how to write tasks to avoid procrastination and how to multitask right.
Quick reminder: You can create tasks from different places:
- From Board Menu in Project Structure view.
- By clicking "ADD TASK" in Kanban or Planning boards view.
Task Editorcopied
To open an existing task, simply hover on it in any board (Kanban, Planning, Status, To Do List) and the icon will appear — just click on it, and it will open the task in Task Editor.
In Task Editor you can edit the task title by simply clicking on the input field, edit notes by clicking on icon in the right corner. You can plan the task or start working on it right from the Task Editor, i.e. no need to close Task Editor and go to Planning or Kanban board. You can also move the task to a different board or delete it.
Attaching files to tasks is available only in paid plans
If you have a task open and somebody else also has the same task open, you will see a warning telling that who is looking at this task with you right now (or if you have it open in a different browser tab). We built this feature to help prevent situations when one person overwrites changes of another person.
Unlike virtually every other project management software, todo.space does NOT have the following fields: Assign To, Due Date, Priority. The reasons for not having due dates and priority are discussed in this blog post. We'll write a blog post about assigning tasks soon but TLDR version is that assigning work to people manually in advance is prone to hurting team performance, creating resource allocation issues and imbalances, and, in general, adults should take responsibility and pride for their work and grab tasks from the backlog as soon as they finish their other work.
Project templatescopied
Similar to software projects where using a particular framework and paradigms would define the project structure , also known as boilerplate code, businesses/startups and innovation projects are no different. To save time for experienced entrepreneurs and to guide less experienced ones, we created several project templates — to start a new business, to start an innovation project within an existing business, and to create traction for an existing product. We picked actionable advice from the following methodologies, frameworks, ideas and turned them into convenient project structures with typical tasks to get done:
- Lean Startup
- Theory of Jobs To Be Done
- The Innovator's Dilemma
- Theory of Constraints
- Blue Ocean Strategy
- The User Method
- Zero to One
Lean Startup Templatecopied
As its name suggests, Lean Startup Template follows Lean Startup Methodology inspired by Toyota's Lean Manufacturing.
In a nutshell, the objective is to figure out not the most complete and polished but the minimum viable product (MVP) that solves the core problem you are hoping to solve for your customers. MVP may be rough on the edges but it works and does solve the problem. Every iteration of your MVP is meant to produce learnings and corrections to your product, pricing, marketing and strategy.
The template comes with five tasks already planned for your To Do List. These five tasks are essential to figure out your customers, market, product, competitors and pricing.
Innovation project Templatecopied
Innovation Project Template is a fusion of several methodologies and frameworks. It also relies on Lean Startup ideas but its focus is less on the product but on your customers and your Go-to-Market strategy and differentiation. The three pillars supporting this process are:
- Theory of Jobs To Be Done
- Blue Ocean Strategy
- 19 Traction Channels
The Theory of Jobs To Be Done is the guiding thinking instrument to understand your customers: What progress are they trying to make, what are their emotional and functional needs around theproblem you are solving.
Both, Theory of Jobs To Be Done and Blue Ocean Strategy help you better understand what are you competing against — look at not only your competitors but also what are your alternatives and substitutes.
The 19 Traction Channels are there to help you figure out how to get to your customers in the most efficient way — online and offline.
The template comes with 15 tasks on 4 boards, and 5 tasks are already planned for you to have an easy start.
Empty Projectcopied
Empty Project template is a single board template when your project is small and straightforward, and does not require project decomposition — just like a simple to-do list.
Traction templatecopied
If you haven't read the book Traction by Gabriel Weinberg and Justin Mares — I highly recommend it. This book introduces the Bullseye Framework and 19 traction channels for acquiring new customers in a systematic and measurable way.
The Traction project template is a powerful tool to streamline your customer acquisition efforts. This template includes 19 boards representing each traction channel, and 96 high-level tasks to execute on them. The boards (traction channels) are organized based on their relevant corporate functions.
Submit Your Templatecopied
Project templates are a great way to save time when starting new projects, but they are also a great way to have a structured, disciplined, repeatable process. This is especially true if you are an independent services agency where many project for different clients have virtually the same structure.
For situations like this, when you want to start a project that is very similar to another one you have started before — instead of starting a new one and replicating everything, you can just clone that project. Cloning will recreate the project structure with all the tasks on the boards. The tasks' status will be reset to New.
Cloning projects is available only in paid plans
If you feel that your project template can be helpful for a lot of other people, and you would be willing to share it with the rest of world, feel free clone such a project and invite us as collaborators using these emails: [email protected] and [email protected].
Please send us an email to [email protected], explaining your project template and who will find it useful. We would be also happy to see you joining our Slack workspace — "Friends of Cubismore". Click here to join.
Collaboratorscopied
Many projects require multiple people to complete them. To bring more people in, open the collaborators popup by clicking the button in the project sidebar. From there, use an email address of the person to share the project with them. If the person is not a todo.space user yet, we will send them an invitation to join.
Collaborators can see and modify all project content like boards and tasks, but they themselves cannot manage project collaborators, clone or delete the project. Everyone who views the project can see the updates happen in real time — there is no need to reload the page.
You can use the same popup to remove collaborators from the project.
Project Settingscopied
To open Project Settings — click on icon in the sidebar. Here you can change the name of the project, its objective, color theme (themes are applied per project), as well as slice the project.
Slicing Projects is available only in paid plans
Teamscopied
Teams are an efficient way to manage projects and collaborators that follows our core principle — keep things as simple as possible for as long as possible.
Teams are available only with the paid Team plan
Policies and Controls
- Teams allow you to restrict users to a specific email domain like your company's domain, so no strangers with generic gmail or hotmail emails can access your team's projects, nor a personal email will be used accidentally.
- You can require members of your team to have MFA activated, so the users without MFA won't be able to access your team's projects.
Members and Collaborators
Probably more than once in the past you received a link to a project or a document just find that you don't have access to it, and you need to request it. Similarly, you were the one asked to give access to somebody just to take a look at something. At some point, you can't even tell who has access to what. Or when you run a project report and see a lot of people without work just to realize they don't really work on this project, and were given access only to watch its status or some other curiosity-related reason. This happened to us way too many times so we decided to make it differently.
In todo.space you can have only four roles:
- Project Owner — is the person who created the project. This person can invite/remove collaborators to/from this project. Also, this is the person who signs off on the project when all tasks are done to mark it completed. Completed projects are immutable (can't be modified).
- Project Collaborator — is the person who is not the owner of the project but was invited to work on it. This person cannot invite other people or sign off on the project completion but can do everything else.
- Team Admin — is the person who manages the team, can invite/remove people to/from the team, manages the billing details and credit card information, can enforce MFA and restrict the email domain. On the project level, Team Admin has the same power as the Project Owner. Team Admin can invite people by email or just create a link to join the team and share with everyone. However, people who joined via the link will have to be approved by the Team Admin before they can see any project.
- Team Member — is the person who was invited to the team by its Admin. This person can open all projects in the team but if this person was not explicitly invited as a collaborator, then this person cannot modify anything in the project. The only thing Team Members can do is to create new tasks — this is gives everybody in the team a reporter/requester capacity, i.e. report bugs, request work to get done.
Think of a scenario when you have only one graphical designer in the company helping everyone — product, marketing and sales. This person receives requests from other people but is the one who does the work. So it's only natural for this graphical designer to create a project to track all these requests without inviting any collaborators — other Team Members will be able to create tasks in this project without any issues.
Moving existing projects to a team
The creation of a team doesn’t mean you need to leave your existing work behind and start anew. For each of your personal projects, there will be an option to move it to one of your teams, even if you’re not an owner of that team. This makes it extremely easy to start small and upgrade to a team when the right time comes — without any disruption to your ongoing work.
Lastly, speaking of upgrades, the teams work on a subscription basis with prices as low as $100 USD per month per team, if billed annually. The team is billed as a single entity and the team's members are not required to have a subscription to be in a team. There are no hidden fees and no per-person pricing — you can have as many collaborators as you need. There is a free 30-day trial and no credit card requirement.
Other Topicscopied
Tagging Boardscopied
Tagging boards allows you to filter boards in Kanban and boards in Project Structure views.
Tags allow to add additional dimension to represent relationship between boards and tasks that is not captured (or cannot be represented) by parent-child relationship.
One way to use it is when each board represents a big feature/user story/subproject, and each board has multiple tasks, so if you want to prioritize what features to work on now, next and later, and you create tags "Now", "Next", "Later" and tag those boards. If you use Scrum, you could use tags to tag boards with Sprint labels (alternatively — epics). Although, we discourage startups from using Scrum, here is why. Also, we invite you to reconsider if you really need to use epics — read this blog post on our humble concerns about epic issues.
To tag a board, open it in Kanban or Planning view, and in the board header, you will see icon — click on it will open Tag Manager popup, which shows existing tags in the project (so that you can reused them) or create new tags.
The same icon in the sidebar can be used in both boards views, as well as in the Project Structure view to filter boards by tag.
To prevent excessive use of tags (as if they were Instagram hashtags), there are two limits:
- The length of a tag is limited to 16 characters
- You can have no more than 10 tags per project
If you need more than 10 tags, the odds are that your project structure has some issues. If you need tags that are longer than 16 characters, there is a chance that beyond potential structural issues, the boards naming can be improved. Whatever the issue is, our team can always find time to review your project together with you. Just let us know via email [email protected] or let's chat in our Slack workspace.
If you rename a tag — the change will propagate to all boards, so don't worry to make a typo, you can always fix it.
Tags for tasks are coming soon!
Linking Projectscopied
To create a link to another project, follow these steps:
- Click on icon in the sidebar to open Project Structure.
- Create a new board where you want the link to be. It doesn't matter what title you give to that board — after the link is created, the board will have the name of the linked project as its title.
- Open this board's menu and click on the third option — "Link Project".
- Pick the project to link from the list in the popup.
Clicking on the link will open the link popup, which gives a quick summary of the project. You can remove the link from the project any time.
Linking projects is available only in paid plans
You can read more about links here.
Extracting Subprojectscopied
Extracting subprojects is a great way to manage complexity, scope and stress. Having smaller projects is a good thing in general. They get completed faster, they are easier to understand and manage. Completing smaller projects every couple of months is much better for morale and sense of accomplishment than muddling through a huge project for several years. All you need is to break one huge project into milestones, phases or subprojects. You can read in more details about extracting subprojects and managing meta-projects in this blog post.
Extracting subprojects is available only in paid plans
To extract a subproject, follow these steps:
- Click on icon in the sidebar to open Project Structure.
- Open the board menu for the board which will be the root board of your subproject.
- Click on the second option — "Extract subtree into a separate project".
The operation is reversible — you can always merge the extracted project back. In fact, you can can merge it into a different project!
Slicing Projectscopied
Slicing projects is available only in paid plans
Slicing a project takes all completed tasks and archives them into a slice. As a result, you won't have infinite boards with dozens of completed tasks. You can still see them in Status Board. To slice a project, go to Project Settings, scroll to the bottom of the popup and click the "Create Slice" button.
This feature is useful when your project doesn't have a specific goal or a definition of done but is rather a task tracking container. This is quite common for support and services projects when you have a continuous stream of incoming work, such as bug reports or work/service requests.
Project in Excelcopied
Downloading projects as XLS is available only with the paid Team plan
In todo.space we wanted to provide you with the essential reporting capabilities for project management that almost always should be sufficient for you. However, we all have been in a situation that we needed to produce a very specific, once-a-quarter report. To help you with this task, we have built an export to XLS functionality. It allows you to export an entire project, as well as just a part of as XLS. Simply open the board which you want to export and click on the "DOWNLOAD AS XLS" button in the board header.
The XLS report contains all the raw data you need:
- List of all descendant boards.
- List of all tasks with (among other things) their status, creation and completion dates, and the person who worked on it.
- Quick stats — count of tasks in backlog, in progress and completed. Stats per collaborator.
The last sheet in the report is the raw data to build a burndown chart.
Burndown Chartcopied
Burndown chart is available only in paid plans
Burndown chart is an easy way to see if the project is moving towards completion or not so much, i.e. amount of work left over time. Our burndown chart widget contains three charts on it:
- Tasks added over time
- Tasks completed over time
- Backlog size over time — actual burndown chart
Having the first two charts is helpful to understand if the project doesn't get completed because its scope is expanding (tasks are being added faster than they get done) or if the team's velocity (productivity) is not sufficient.
The trend line there is a linear regression that gives a simple and naive summary of the project completion trend. The quality of this forecast is reflected in the message below the chart.
There is one more thing — you can run a simulation of what would happen if you had one more collaborator? It's a very common question many of us needed to answer from time to time. We tried to take a stab at it but take it with a pound of salt. Remember, nine women cannot deliver a baby in one month.
- The work can still be done in parallel — one more collaborator will not have to wait for anybody, and nobody will have to wait for that collaborator either.
- Everyone in this project has more or less the same productivity, including the person added.
- The skill set of the person is appropriate to the work to get done — another engineer won't be able to help with marketing or sales.
- Getting work done faster will not lead to more work created — the project scope will not increase.
- The unknowns in the project will not be discovered and handled earlier despite getting work done faster.
Using Gitcopied
Git and GitHub integration is available only in paid Team plan
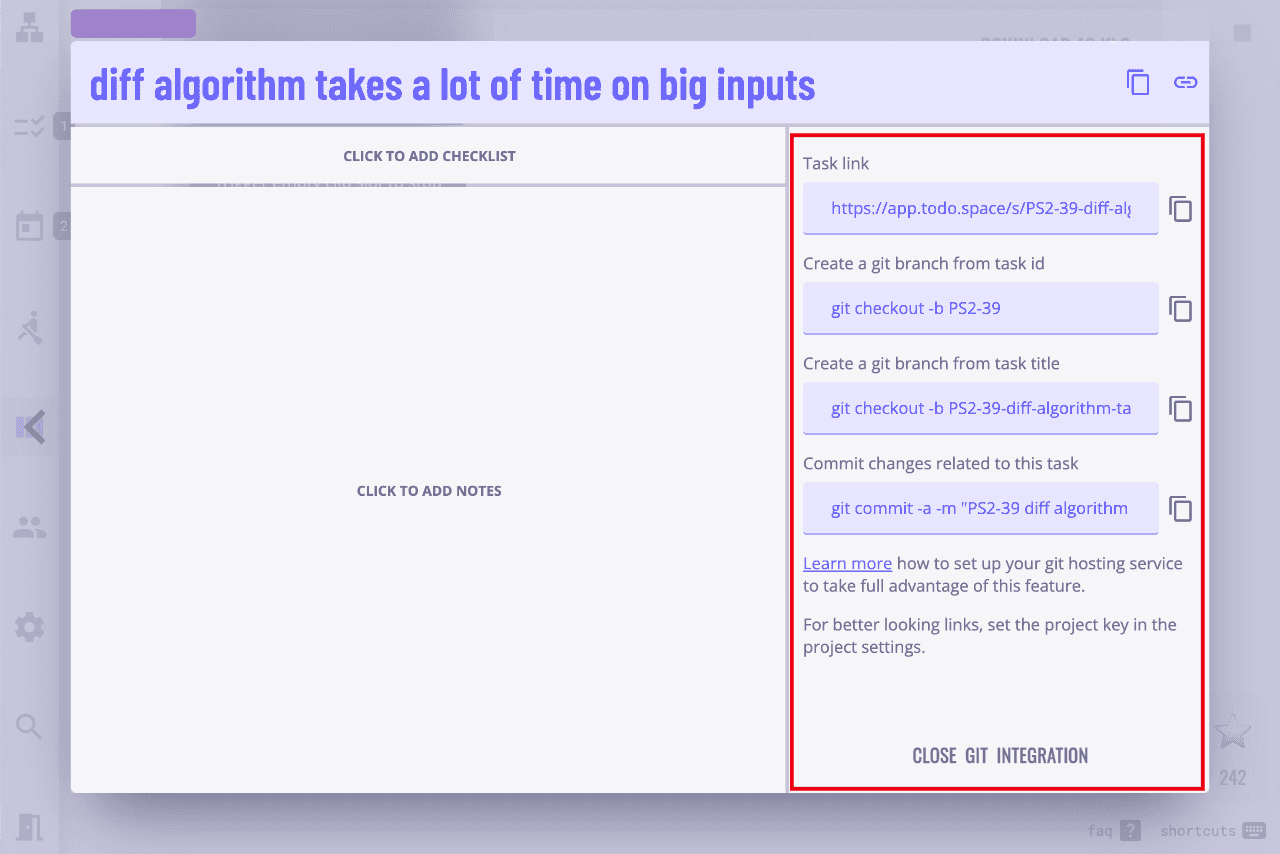
Tasks in todo.space can be correlated with branches and commits in Git to improve traceability. The most common approach to ensure that changes in Git relate to a task in the project management system is by including the task’s ID and, optionally, a short description in the branch name and commit message.
For each task, todo.space can suggest the following:
- A Git branch name that corresponds to the task’s ID and title
- A commit message that includes the task’s ID and title
- A human-friendly link to the task
To access these, open any task in the project and click the "Git Integration" button in the right panel. Copy one of the suggestions and use it in your terminal.
Integrating with GitHub
If you use GitHub to host your source code, todo.space can integrate with it to automatically complete tasks once the pull request related to the task is merged.
GitHub integration can be set up in one of two places:
- On the “PROFILE” page – Use this option to limit GitHub integration to only your personal projects.
- In the ”TEAM SETTINGS” of any team where you are an admin – Use this option to enable GitHub integration for both your team’s projects and your personal ones.
Clicking the "SET UP GITHUB CONNECTION" button will take you to GitHub, where you can authorize the installation of the todo.space app into your personal or organization’s GitHub account and configure repository access.
Once installed, the app listens for closed pull requests in the repositories it has access to and attempts to find a corresponding task in your todo.space team or personal projects. If a matching task is found, it will be automatically moved to Completed status.
GitHub integration will find the task if one of the following conditions is met:
- The source branch name in the pull request starts with a task ID (e.g.,
DEV-123) - The PR title starts with a task ID (e.g.,
DEV-123) - Any line in the PR body follows this format:
todo.space.closes: DEV-123
To prevent GitHub integration from completing a task even if it matches the rules above, add the following line to the PR body:
todo.space.no-close
Got questions?copied
If you still have questions about todo.space, want to suggest a feature or report an issue — please send us an email to [email protected]. We would be also happy to see you joining our Slack workspace — "Friends of Cubismore". Click here to join.